Introduction
Welcome to the nearcore development guide!
The target audience of this guide are developers of nearcore itself. If you are a user of NEAR (either a contract developer, or validator running a node), please refer to the user docs at https://docs.near.org.
This guide is built with mdBook from sources in the nearcore repository. You can edit it by pressing the "edit" icon in the top right corner, we welcome all contributions. The guide is hosted at https://near.github.io/nearcore/.
The guide is organized as a collection of loosely coupled chapters -- you don't need to read them in order, feel free to peruse the TOC, and focus on the interesting bits. The chapters are classified into three parts:
- Architecture talks about how the code works. So, for example, if you are interested in how a transaction flows through the system, look there!
- Practices describe, broadly, how we write code. For example, if you want to learn about code style, issue tracking, or debugging performance problems, this is the chapter for you.
- Finally, the Misc part holds various assorted bits and pieces. We are trying to bias ourselves towards writing more docs, so, if you want to document something and it doesn't cleanly map to a category above, just put it in misc!
If you are unsure, start with the next chapter, Architecture Overview
Overview
This document describes the high-level architecture of nearcore. The focus here is on the implementation of the blockchain protocol, not the protocol itself. For reference documentation of the protocol, please refer to nomicon
Some parts of our architecture are also covered in this video series on YouTube.
Bird's Eye View
If we put the entirety of nearcore onto one picture, we get something like this:

Don't worry if this doesn't yet make a lot of sense: hopefully, by the end of this document the above picture would become much clearer!
Overall Operation
nearcore is a blockchain node -- it's a single binary (neard) which runs on
some machine and talks to other similar binaries running elsewhere. Together,
the nodes agree (using a distributed consensus algorithm) on a particular
sequence of transactions. Once transaction sequence is established, each node
applies transactions to the current state. Because transactions are fully
deterministic, each node in the network ends up with identical state. To allow
greater scalability, NEAR protocol uses sharding, which allows a node to hold
only a small subset (shard) of the whole state.
neard is a stateful, restartable process. When neard starts, the node
connects to the network and starts processing blocks (block is a batch of
transactions, processed together; transactions are batched into blocks for
greater efficiency). The results of processing are persisted in the database.
RocksDB is used for storage. Usually, the node's data is found in the ~/.near
directory. The node can be stopped at any moment and be restarted later. While
the node is offline it misses the block, so, after a restart, the sync process
kicks in which brings the node up-to-speed with the network by downloading the
missing bits of history from more up-to-date peer nodes.
Major components of nearcore:
-
JSON RPC. This HTTP RPC interface is how
neardcommunicates with non-blockchain outside world. For example, to submit a transaction, some client sends an RPC request with it to some node in the network. From that node, the transaction propagates through the network, until it is included in some block. Similarly, a client can send an HTTP request to a node to learn about current state of the blockchain. The JSON RPC interface is documented here. -
Network. If RPC is aimed "outside" the blockchain, "network" is how peer
neardnodes communicate with each other within blockchain. RPC carries requests from users of the blockchain, while network carries various messages needed to implement consensus. Two directly connected nodes communicate by sending protobuf-encoded messages over TCP. A node also includes logic to route messages for indirect peers through intermediaries. Oversimplifying a lot, it's enough for a new node to know an IP address of just one other network participant. From this bootstrap connection, the node learns how to communicate with any other node in the network. -
Client. Somewhat confusingly named, client is the logical state of the blockchain. After receiving and decoding a request, both RPC and network usually forward it in the parsed form to the client. Internally, client is split in two somewhat independent components: chain and runtime.
-
Chain. The job of chain, in a nutshell, is to determine a global order of transactions. Chain builds and maintains the blockchain data structure. This includes block and chunk production and processing, consensus, and validator selection. However, chain is not responsible for actually applying transactions and receipts.
-
Runtime. If chain selects the order of transactions, Runtime applies transaction to the state. Chain guarantees that everyone agrees on the order and content of transactions, and Runtime guarantees that each transaction is fully deterministic. It follows that everyone agrees on the "current state" of the blockchain. Some transactions are as simple as "transfer X tokens from Alice to Bob". But a much more powerful class of transactions is supported: "run this arbitrary WebAssembly code in the context of the current state of the chain". Running such "smart contract" transactions securely and efficiently is a major part of what runtime does. Today, runtime uses a JIT compiler to do that.
-
Storage. Storage is more of a cross-cutting concern, than an isolated component. Many parts of a node want to durably persist various bits of state to disk. One notable case is the logical state of the blockchain, and, in particular, data associated with each account. Logically, the state of account on a chain is a key-value map:
HashMap<Vec<u8>, Vec<u8>>. But there is a twist: it should be possible to provide a succinct proof that a particular key indeed holds a particular value. To allow that internally the state is implemented as a persistent (in both senses, "functional" and "on disk") merkle-patricia trie. -
Parameter Estimator. One kind of transaction we support is "run this arbitrary, Turing-complete computation". To protect from a
loop {}transaction halting the whole network, runtime implements resource limiting: each transaction runs with a certain finite amount of "gas", and each operation costs a certain amount of gas to perform. Parameter estimator is essentially a set of benchmark used to estimate relative gas costs of various operations.
Entry Points
neard/src/main.rs contains the main function that starts a blockchain node.
However, this file mostly only contains the logic to parse arguments and
dispatch different commands. start_with_config in nearcore/src/lib.rs is the
actual entry point and it starts all the actors.
JsonRpcHandler::process in the jsonrpc crate is the RPC entry point. It
implements the public API of a node, which is documented
here.
PeerManagerActor::spawn in the network is an entry for the other point of
contract with the outside world -- the peer-to-peer network.
Runtime::apply in the runtime crate is the entry point for transaction
processing logic. This is where state transitions actually happen, after chain
decided that, according to distributed consensus, which transitions need to
happen.
Code Map
This section contains some high-level overview of important crates and data structures.
core/primitives
This crate contains most of the types that are shared across different crates.
core/primitives-core
This crate contains types needed for runtime.
core/store/trie
This directory contains the MPT state implementation. Note that we usually use
TrieUpdate to interact with the state.
chain/chain
This crate contains most of the chain logic (consensus, block processing, etc).
ChainUpdate::process_block is where most of the block processing logic
happens.
Architecture Invariant: interface between chain and runtime is defined by
RuntimeAdapter. All invocations of runtime goes through RuntimeAdapter
State update
The blockchain state can be changed in the following two ways:
- Applying a chunk. This is how the state is normally updated: through
Runtime::apply. - State sync. State sync can happen in two cases:
- A node is far enough behind the most recent block and triggers state sync to fast forward to the state of a very recent block without having to apply blocks in the middle.
- A node is about to become validator for some shard in the next epoch, but it
does not yet have the state for that shard. In this case, it would run state
sync through the
catchuproutine.
chain/chunks
This crate contains most of the sharding logic which includes chunk creation,
distribution, and processing. ShardsManager is the main struct that
orchestrates everything here.
chain/client
This crate defines two important structs, Client and ViewClient. Client
includes everything necessary for the chain (without network and runtime) to
function and runs in a single thread. ViewClient is a "read-only" client that
answers queries without interfering with the operations of Client.
ViewClient runs in multiple threads.
chain/network
This crate contains the entire implementation of the p2p network used by NEAR blockchain nodes.
Two important structs here: PeerManagerActor and Peer. Peer manager
orchestrates all the communications from network to other components and from
other components to network. Peer is responsible for low-level network
communications from and to a given peer. Peer manager runs in one thread while
each Peer runs in its own thread.
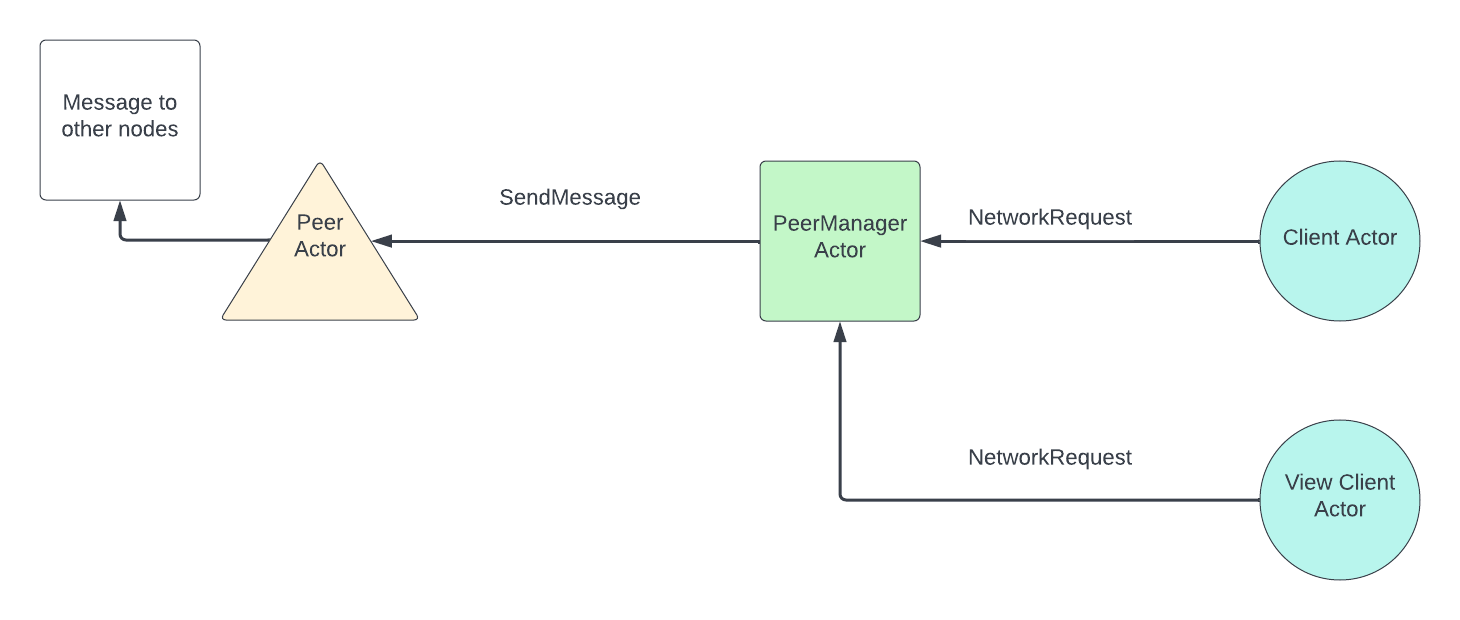
Architecture Invariant: Network communicates to Client through
NetworkClientMessages and to ViewClient through NetworkViewClientMessages.
Conversely, Client and ViewClient communicates to network through
NetworkRequests.
chain/epoch_manager
This crate is responsible for determining validators and other epoch related information such as epoch id for each epoch.
Note: EpochManager is constructed in NightshadeRuntime rather than in
Chain, partially because we had this idea of making epoch manager a smart
contract.
chain/jsonrpc
This crate implements JSON-RPC API server to enable
submission of new transactions and inspection of the blockchain data, the
network state, and the node status. When a request is processed, it generates a
message to either ClientActor or ViewClientActor to interact with the
blockchain. For queries of blockchain data, such as block, chunk, account, etc,
the request usually generates a message to ViewClientActor. Transactions, on
the other hand, are sent to ClientActor for further processing.
runtime/runtime
This crate contains the main entry point to runtime -- Runtime::apply. This
function takes ApplyState, which contains necessary information passed from
chain to runtime, and a list of SignedTransaction and a list of Receipt, and
returns a ApplyResult, which includes state changes, execution outcomes, etc.
Architecture Invariant: The state update is only finalized at the end of
apply. During all intermediate steps state changes can be reverted.
runtime/near-vm-logic
VMLogic contains all the implementations of host functions and is the
interface between runtime and wasm. VMLogic is constructed when runtime
applies function call actions. In VMLogic, interaction with NEAR blockchain
happens in the following two ways:
VMContext, which contains lightweight information such as current block hash, current block height, epoch id, etc.External, which is a trait that contains functions to interact with blockchain by either reading some nontrivial data, or writing to the blockchain.
runtime/near-vm-runner
run function in runner.rs is the entry point to the vm runner. This function
essentially spins up the vm and executes some function in a contract. It
supports different wasm compilers including wasmer0, wasmer2, and wasmtime
through compile-time feature flags. Currently we use wasmer0 and wasmer2 in
production. The imports module exposes host functions defined in
near-vm-logic to WASM code. In other words, it defines the ABI of the
contracts on NEAR.
neard
As mentioned before, neard is the crate that contains that main entry points.
All the actors are spawned in start_with_config. It is also worth noting that
NightshadeRuntime is the struct that implements RuntimeAdapter.
core/store/src/db.rs
This file contains schema (DBCol) of our internal RocksDB storage - a good starting point when reading the code base.
Cross Cutting Concerns
Observability
The tracing crate is used for structured, hierarchical event output and logging. We also integrate Prometheus for light-weight metric output. See the style documentation for more information on the usage.
Testing
Rust has built-in support for writing unit tests by marking functions
with #[test] directive. Take full advantage of that! Testing not
only confirms that what was written works the way it was intended but
also help during refactoring since the caught unintended behaviour
changes.
Not all tests are created equal though and while some can need only
milliseconds to run, others may run for several seconds or even
minutes. Tests that take a long time should be marked as such with an
expensive_tests feature, for example:
#![allow(unused)]
fn main() {
#[test]
#[cfg_attr(not(feature = "expensive_tests"), ignore)]
fn test_catchup_random_single_part_sync() {
    test_catchup_random_single_part_sync_common(false, false, 13)
}
}
Such tests will be ignored by default and can be executed by using
--ignored or --include-ignored flag as in cargo test -- --ignored or by compiling the tests with expensive_tests feature
enabled.
Because expensive tests are not run by default, they are also not run
in CI. Instead, they are run nightly and need to be explicitly
included in nightly/expensive.txt file; for example:
expensive --timeout=1800 near-client near_client tests::catching_up::test_catchup_random_single_part_sync
expensive --timeout=1800 near-client near_client tests::catching_up::test_catchup_random_single_part_sync --features nightly
For more details regarding nightly tests see nightly/README.md.
Note that what counts as a slow test isn’t exactly defined as of now. If it takes just a couple seconds than it’s probably fine. Anything slower should probably be classified as expensive test. In particular, if libtest complains the test takes more than 60 seconds than it definitely is.
How neard works
This chapter describes how neard works with a focus on implementation details and practical scenarios. To get a better understanding of how the protocol works, please refer to nomicon. For a high-level code map of nearcore, please refer to this document.
High level overview
On the high level, neard is a daemon that periodically receives messages from the network and sends messages to peers based on different triggers. Neard is implemented using an actor framework called actix.
Note: Using actix was decided in the early days of the implementation of nearcore and by no means represents our confidence in actix. On the contrary, we have noticed a number of issues with actix and are considering implementing an actor framework in house.
There are several important actors in neard:
-
PeerActorEach peer is represented by one peer actor and runs in a separate thread. It is responsible for sending messages to and receiving messages from a given peer. AfterPeerActorreceives a message, it will route it toClientActor,ViewClientActor, orPeerManagerActordepending on the type of the message. -
PeerManagerActorPeer Manager is responsible for receiving messages to send to the network from eitherClientActororViewClientActorand routing them to the rightPeerActorto send the bytes over the wire. It is also responsible to handle some types of network messages received and routed throughPeerActor. For the purpose of this document, we only need to know thatPeerManagerActorhandlesRoutedMessages. ForRoutedMessages, peer manager would decide whether they should be routed toClientActororViewClientActor. -
ClientActorClient actor is the “core” of neard. It contains all the main logic including consensus, block and chunk processing, state transition, garbage collection, etc. Client actor is single threaded. -
ViewClientActorView client actor can be thought of as a read-only interface to client. It only accesses data stored in a node’s storage and does not mutate any state. It is used for two purposes:- Answering rpc requests by fetching the relevant piece of data from storage
- Handle some network requests that do not require any changes to the storage, such as header sync, state sync, and block sync requests.
ViewClientActorruns in four threads by default but this number is configurable.
Data flow within neard
Flow for incoming messages:

Flow for outgoing messages:
How neard operates when it is fully synced
When a node is fully synced, the main logic of the node operates in the following way (the node is assumed to track all shards, as most nodes on mainnet do today):
- A block is produced by some block producer and sent to the node through broadcasting.
- The node receives a block and tries to process it. If the node is synced it presumably has the previous block and the state before the current block to apply. It then checks whether it has all the chunks available. If the node is not a validator node, it won’t have any chunk parts and therefore won’t have the chunks available. If the node is a validator node, it may already have chunk parts through chunk parts forwarding from other nodes and therefore may have already reconstructed some chunks. Anyways, if the node doesn’t have all chunks for all shards, it will request them from peers by parts.
- The chunk requests are sent and the node waits for enough chunk parts to be
received to reconstruct the chunks. For each chunk, 1/3 of all the parts
(100) is sufficient to reconstruct a chunk. In the meantime, if new blocks
arrive, they will be put into a
OrphanPool, waiting to be processed. If a chunk part request is not responded to withinchunk_request_retry_period, which is set to 400ms by default, then a request for the same chunk part would be sent again. - After all chunks are reconstructed, the node processes the current block by applying transactions and receipts from the chunks. Afterwards, it will update the head according to the fork choice rule, which only looks at block height. In other words, if the newly processed block is of higher height than the current head of the node, the head is updated.
- The node checks whether any blocks in the
OrphanPoolis ready to be processed in a BFS manner and processes all of them until none can be processed any more. Note that a block is put into theOrphanPoolif and only if its previous block is not accepted. - Upon acceptance of a block, the node would check whether it needs to run garbage collection. If it needs to, it would garbage collect two blocks worth of data at a time. The logic of garbage collection is complicated and could be found here.
- If the node is a validator node, it would start a timer after the current
block is accepted. After
min_block_production_delaywhich is currently configured to be 1.3s on mainnet, it would send an approval to the block producer of the next block (current block height + 1).
The main logic is illustrated below:

How neard works when it is synchronizing
PeerManagerActor periodically sends a NetworkInfo message to ClientActor
to update it on the latest peer information, which includes the height of each
peer. Once ClientActor realizes that it is more than sync_height_threshold
(which by default is set to 1) behind the highest height among peers, it starts
to sync. The synchronization process is done in three steps:
-
Header sync. The node first identifies the headers it needs to sync through a
get_locatorcalculation. This is essentially an exponential backoff computation that tries to identify commonly known headers between the node and its peers. Then it would request headers from different peers, at mostMAX_BLOCK_HEADER_HASHES(which is 512) headers at a time. -
After the headers are synced, the node would determine whether it needs to run state sync. The exact condition can be found here but basically a node would do state sync if it is more than 2 epochs behind the head of the network. State sync is a very complex process and warrants its own section. We will give a high level overview here.
- First, the node computes
sync_hashwhich is the hash of the block that identifies the state that the node wants to sync. This is guaranteed to be the first block of the most recent epoch. In fact, there is a check on the receiver side that this is indeed the case. The node would also request the block whose hash issync_hash - The node deletes basically all data (blocks, chunks, state) from its storage. This is not an optimal solution, but it makes the implementation for combining state easier when there is no stale data in storage.
- For the state of each shard that the node needs to download, it first requests a header that contains some metadata the node needs to know about. Then the node computes the number of state parts it needs to download and requests those parts from different peers who track the shard.
- After all parts are downloaded, the node combines those state parts and then finalizes the state sync by applying the last chunk included in or before the sync block so that the node has the state after applying sync block to be able to apply the next block.
- The node resets heads properly after state sync.
- First, the node computes
-
Block Sync. The node first gets the block with highest height that is on the canonical chain and request from there
MAX_BLOCK_REQUESTS(which is set to 5) blocks from different peers in a round robin order. The block sync routine runs again if head has changed (progress is made) or if a timeout (which is set to 2s) has happened.
Note: when a block is received and its height is no more than 500 + the node’s current head height, then the node would request its previous block automatically. This is called orphan sync and helps to speed up the syncing process. If, on the other hand, the height is more than 500 + the node’s current head height, the block is simply dropped.
How ClientActor works
ClientActor has some periodically running routines that are worth noting:
- Doomslug
timer.
This routine runs every
doosmslug_step_period(set to 100ms by default) and updates consensus information. If the node is a validator node, it also sends approvals when necessary. - Block
production.
This routine runs every
block_production_tracking_delay(which is set to 100ms by default) and checks if the node should produce a block. - Log summary. Prints a log line that summarizes block rate, average gas used, the height of the node, etc every 10 seconds.
- Resend chunk
requests.
This routine runs every
chunk_request_retry_period(which is set to 400ms). It resends the chunk part requests for those that are not yet responded to. - Sync.
This routine runs every
sync_step_period(which is set to 10ms by default) and checks whether the node needs to sync from its peers as well as actually starts the syncing process. - Catch
up.
This routine runs every
catchup_step_period(which is set to 100ms by default) and runs the catch up process. This only applies if a node validates shard A in epoch X and is going to validate a different shard B in epoch X+1. In this case, the node would start downloading the state for shard B at the beginning of epoch X. After the state downloading is complete, it would apply all blocks in the current epoch (epoch X) for shard B to ensure that the node has the state needed to validate shard B when epoch X+1 starts.
Garbage Collection
This document covers the basics of Chain garbage collection.
Currently we run garbage collection only in non-archival nodes, to keep the size of the storage under control. Therefore, we remove blocks, chunks and state that is ‘old’ enough - which in current configuration means 5 epochs ago.
We run a single ‘round’ of GC after a new block is accepted to the chain - and in order not to delay the chain too much, we make sure that each round removes at most 2 blocks from the chain.
How it works:
Imagine the following chain (with 2 forks)

In the pictures below, let’s assume that epoch length is 5 and we keep only 3 epochs (rather than 5 that is currently set in production) - otherwise the image becomes too large 😉
If head is in the middle of the epoch, the gc_stop will be set to the first block of epoch T-2, and tail & fork_tail will be sitting at the last block of epoch T-3.
(and no GC is happening in this round - as tail is next to gc_stop).

Next block was accepted on the chain (head jumped ahead), but still no GC happening in this round:

Now interesting things will start happening, once head ‘crosses’ over to the next epoch.
First, the gc_stop will jump to the beginning of the next epoch.

Then we’ll start the GC of the forks: by first moving the ‘fork_tail’ to match the gc_stop and going backwards from there.

It will start removing all the blocks that don’t have a successor (a.k.a the tip of the fork). And then it will proceed to lower height.

Will keep going until it ‘hits’ the tail.

In order not to do too much in one go, we’d only remove up to 2 block in each run (that happens after each head update).
Now, the forks are gone, so we can proceed with GCing of the blocks from canonical chain:

Same as before, we’d remove up to 2 blocks in each run:

Until we catchup to the gc_stop.
(the original drawings for this document are here: https://docs.google.com/document/d/1BiEuJqm4phwQbi-fjzHMZPzDL-94z9Dqkc3XPNnxKJM/edit?usp=sharing)
Trie
We use Merkle-Patricia Trie to store blockchain state. Trie is persistent, which means that insertion of new node actually leads to creation of new path to this node, and thus root of Trie after insertion will also be presented by new object.
Here we describe its implementation details which are closely related to Runtime.
Main structures
Trie
Trie stores the state - accounts, contract codes, access keys, etc. Each state item corresponds to the unique trie key. All types of trie keys are described in the TrieKey section. You can read more about this structure on Wikipedia.
Trie is stored in the RocksDB, which is persistent across node restarts. Trie
communicates with database using TrieStorage. On the database level, data is
stored in key-value format in DBCol::State column. There are two kinds of
records:
- trie nodes, for which key is constructed from shard id and
RawTrieNodeWithSizehash, and value is aRawTrieNodeWithSizeserialized by custom algorithm; - values (encoded contract codes, postponed receipts, etc.), for which key is constructed from shard id and hash of value, which maps to the encoded value.
So, value can be obtained from TrieKey as follows:
- start from the hash of
RawTrieNodeWithSizecorresponding to the root; - descend to the needed node using nibbles from
TrieKey; - extract underlying
RawTrieNode; - if it is a
LeaforBranch, it should contain hash of the value; - get value from storage by its hash and shard id.
Note that Trie is almost never called directly from Runtime, modifications
are made using TrieUpdate.
TrieUpdate
Provides a way to access storage and record changes to commit in the future. Update is prepared as follows:
- changes are made using
setandremovemethods, which are added toprospectivefield, - call
commitmethod which movesprospectivechanges tocommitted, - call
finalizemethod which preparesTrieChangesand state changes based oncommittedfield.
Note that finalize, Trie::insert and Trie::update do not update the
database storage. These functions only modify trie nodes in memory. Instead,
these functions prepares TrieChanges object, and Trie is actually updated
when ShardTries::apply_insertions is called, which puts new values to
DBCol::State part of key-value database.
TrieStorage
Stores all Trie nodes and allows to get serialized nodes by TrieKey hash
using retrieve_raw_bytes method.
There are three implementations of TrieStorage:
TrieCachingStorage- caches big values ever read byretrieve_raw_bytes.TrieRecordingStorage- records all key-value pairs ever read byretrieve_raw_bytes. Used for obtaining state parts (and challenges in the future).TrieMemoryPartialStorage- used for validating recorded partial storage.
Note that these storages use database keys, which are retrieved using hashes of
trie nodes using get_key_from_shard_id_and_hash method.
ShardTries
Contains stores and caches and allows to get Trie object for any shard.
Primitives
TrieKey
Describes all keys which may be inserted to Trie:
AccountContractCodeAccessKeyReceivedDataPostponedReceiptIdPendingDataCountPostponedReceiptDelayedReceiptIndicesDelayedReceiptContractData
Each key is uniquely converted to Vec<u8>. Internally, each such vector is
converted to NibbleSlice (nibble is a half of a byte), and each its item
corresponds to one step down in Trie.
TrieChanges
Stores result of updating Trie.
old_root: root before updatingTrie, i.e. inserting new nodes and deleting old ones,new_root: root after updatingTrie,insertions,deletions: vectors ofTrieRefcountChange, describing all inserted and deleted nodes.
TrieRefcountChange
Because we remove unused nodes during garbage collection, we need to track
reference count (rc) for each node. Another reason is that we can dedup
values. If the same contract is deployed 1000 times, we only store one contract
binary in storage and track its count.
This structure is used to update rc in the database:
trie_node_or_value_hash- hash of the trie node or value, used for uniting with shard id to get DB key,trie_node_or_value- serialized trie node or value,rc- change of reference count.
Note that for all reference-counted records, the actual value stored in DB is
the concatenation of trie_node_or_value and rc. The reference count is
updated using custom merge operation merge_refcounted_records.
This document describes how our network works. At this moment, it is known to be somewhat outdated, as we are in the process of refactoring the network protocol somewhat significantly.
1. Overview
Near Protocol uses its own implementation of a custom peer-to-peer network Peers who join network are represented by nodes and connections between them by edges.
The purpose of this document is to describe inner workings of near-network
package; and to be used as reference by future engineers to understand network
code without any prior knowledge.
2. Code structure
near-network runs on top of actor framework called Actix
(https://actix.rs/docs/). Code structure is split between 4 actors
PeerManagerActor, PeerActor, RoutingTableActor, EdgeValidatorActor
2.1 EdgeValidatorActor (currently called EdgeVerifierActor in the code (TODO rename))
EdgeValidatorActor runs on separate thread. The purpose of this actor is to
validate edges, where each edge represents a connection between two peers,
and it's signed with a cryptographic signature of both parties. The process of
edge validation involves verifying cryptographic signatures, which can be quite
expensive, and therefore was moved to another thread.
Responsibilities:
- validating edges by checking whenever cryptographic signatures match.
2.2 RoutingTableActor
RoutingTableActor maintain view of the P2P network represented by set of
nodes and edges.
In case a message needs to be sent between two nodes, that can be done directly
through Tcp connection. Otherwise, RoutingTableActor is responsible for ping
the best path between them.
Responsibilities:
- keep set of all edges of
P2P networkcalled routing table - connects to
EdgeValidatorActor, and asks for edges to be validated, when needed - has logic related to exchanging edges between peers
2.3 PeerActor
Whenever a new connection gets accepted, an instance of PeerActor gets
created. Each PeerActor keeps a physical a TCP connection to exactly one
peer.
Responsibilities:
- Maintaining physical connection.
- Reading messages from peers, decoding them, and then forwarding them to the right place.
- Encoding messages, sending them to peers on physical layer.
- Routing messages between
PeerManagerActorand other peers.
2.4 PeerManagerActor
PeerManagerActor is the main actor of near-network crate. It's acts as a
bridge connecting to the world outside, the other peers, and ClientActor and
ClientViewActor, which handle processing any operations on the chain.
PeerManagerActor maintains information about p2p network via (Routing Table
Actor), and indirectly, through PeerActor, connections to all some nodes on
the network. All messages going to other nodes, or coming from other nodes will
be routed through this Actor. PeerManagerActor is responsible for accepting
incoming connections from the outside world and creating PeerActors to manage
them.
Responsibilities:
- Accepting new connections
- Maintaining list of
PeerActors, creating, deleting them - Routing information about new edges between
PeerActorsandRoutingTableManager - Routing messages between
ViewClient,ViewClientActorandPeerActors, and consequently other peers. - Maintains
RouteBackstructure, which has information on how to send replies to messages
3. Code flow - initialization
PeerManagerActor actor gets started. PeerManagerActor open tcp server, which
listens to incoming connection. It starts RoutingTableActor, which then starts
EdgeValidatorActor. When connection incoming connection gets accepted, it
starts a new PeerActor on its own thread.
4. NetworkConfig
near-network reads configuration from NetworkConfig, which is a part client config.
Here is a list of features read from config
boot_nodes- list of nodes to connect to on startaddr- listening addressmax_num_peers- by default we connect up to 40 peers, current implementation supports upto 128 nodes.
5. Connecting to other peers.
Each peer maintains list of known peers. They are stored in the database. If
database is empty, the list of peers, called boot nodes, will be read from
boot_nodes option in config. Peer to connect to is chosen at random from list
of known nodes by PeerManagerActor::sample_random_peer method.
6. Edges & network - in code representation
P2P network is represented by list of peers, where each peer is
represented by structure PeerId, which is defined by peer's public key
PublicKey. And a list of edges, where each edge is represented by the
structure Edge.
Both are defined below.
6.1 PublicKey
We use two types of public keys:
- a 256 bit
ED25519public key - a 512 bit
Secp256K1public key
Public keys are defined in PublicKey enum, which consists of those two
variants.
#![allow(unused)]
fn main() {
pub struct ED25519PublicKey(pub [u8; 32]);
pub struct Secp256K1PublicKey([u8; 64]);
pub enum PublicKey {
    ED25519(ED25519PublicKey),
    SECP256K1(Secp256K1PublicKey),
}
}
6.2 PeerId
Each peer is uniquely defined by its PublicKey, and represented by PeerId
struct.
#![allow(unused)]
fn main() {
pub struct PeerId(PublicKey);
}
6.3 Edge
Each edge is represented by Edge structure. It contains the following
- pair of nodes represented by their public keys.
nonce- a unique number representing state of an edge. Starting with 1. Odd number represents an active edge. Even number represent an edge in which one of nodes, confirmed that the edge is removed.- Signatures from both peers for active edges.
- Signature from one peers in case an edge got removed.
6.4 Graph representation
RoutingTableActor is responsible for storing and maintaining set of all edges.
They are kept in edge_info data structure of type HashSet<Edge>.
#![allow(unused)]
fn main() {
pub struct RoutingTableActor {
    /// Collection of edges representing P2P network.
    /// It's indexed by `Edge::key()` key and can be search through by called `get()` function
    /// with `(PeerId, PeerId)` as argument.
    pub edges_info: HashSet<Edge>,
    /// ...
}
}
7. Code flow - connecting to a peer - handshake
When PeerManagerActor starts it starts to listen to a specific port.
7.1 - Step 1 - monitor_peers_trigger runs
PeerManager checks if we need to connect to another peer by running
PeerManager::is_outbound_bootstrap_needed method. If true we will try to
connect to new node. Let's call current node, node A.
7.2 - Step 2 - choosing node to connect to
Method PeerManager::sample_random_peer will be called, and it returns node B
that we will try to connect to.
7.3 - Step 3 - OutboundTcpConnect message
PeerManagerActor will send to itself a message OutboundTcpConnect in order
to connect to node B.
#![allow(unused)]
fn main() {
pub struct OutboundTcpConnect {
    /// Peer information of the outbound connection
    pub target_peer_info: PeerInfo,
}
}
7.4 - Step 4 - OutboundTcpConnect message
On receiving the message handle_msg_outbound_tcp_connect method will be
called, which calls TcpStream::connect to create new connection.
7.5 - Step 5 - Connection gets established
Once connection with outgoing peer gets established. try_connect_peer method
will be called. And then new PeerActor will be created and started. Once
PeerActor starts it will send Handshake message to outgoing node B over
tcp connection.
This message contains protocol_version, node's A metadata, as well as all
information necessary to create Edge.
#![allow(unused)]
fn main() {
pub struct Handshake {
    /// Current protocol version.
    pub(crate) protocol_version: u32,
    /// Oldest supported protocol version.
    pub(crate) oldest_supported_version: u32,
    /// Sender's peer id.
    pub(crate) sender_peer_id: PeerId,
    /// Receiver's peer id.
    pub(crate) target_peer_id: PeerId,
    /// Sender's listening addr.
    pub(crate) sender_listen_port: Option<u16>,
    /// Peer's chain information.
    pub(crate) sender_chain_info: PeerChainInfoV2,
    /// Represents new `edge`. Contains only `none` and `Signature` from the sender.
    pub(crate) partial_edge_info: PartialEdgeInfo,
}
}
7.6 - Step 6 - Handshake arrives at node B
Node B receives Handshake message. Then it performs various validation
checks. That includes:
- Check signature of edge from the other peer.
- Whenever,
nonceis the edge send matches. - Check whenever the protocol is above the minimum
OLDEST_BACKWARD_COMPATIBLE_PROTOCOL_VERSION - Other node
view of chainstate
If everything is successful, PeerActor will send RegisterPeer message to
PeerManagerActor. This message contains everything needed to add PeerActor
to list of active connections in PeerManagerActor.
Otherwise, PeerActor will be stopped immediately or after some timeout.
#![allow(unused)]
fn main() {
pub struct RegisterPeer {
    pub(crate) actor: Addr<PeerActor>,
    pub(crate) peer_info: PeerInfo,
    pub(crate) peer_type: PeerType,
    pub(crate) chain_info: PeerChainInfoV2,
    // Edge information from this node.
    // If this is None it implies we are outbound connection, so we need to create our
    // EdgeInfo part and send it to the other peer.
    pub(crate) this_edge_info: Option<EdgeInfo>,
    // Edge information from other node.
    pub(crate) other_edge_info: EdgeInfo,
    // Protocol version of new peer. May be higher than ours.
    pub(crate) peer_protocol_version: ProtocolVersion,
}
}
7.7 - Step 7 - PeerManagerActor receives RegisterPeer message - node B
In handle_msg_consolidate method RegisterPeer message will be validated. If
successful register_peer method will be called, which adds PeerActor to list
of connected peers.
Each connected peer is represented in PeerActorManager in ActivePeer data
structure.
TODO: Rename ActivePeer to RegisterPeer.
#![allow(unused)]
fn main() {
/// Contains information relevant to an active peer.
struct ActivePeer { // will be renamed to `ConnectedPeer` see #5428
    addr: Addr<PeerActor>,
    full_peer_info: FullPeerInfo,
    /// Number of bytes we've received from the peer.
    received_bytes_per_sec: u64,
    /// Number of bytes we've sent to the peer.
    sent_bytes_per_sec: u64,
    /// Last time requested peers.
    last_time_peer_requested: Instant,
    /// Last time we received a message from this peer.
    last_time_received_message: Instant,
    /// Time where the connection was established.
    connection_established_time: Instant,
    /// Who started connection. Inbound (other) or Outbound (us).
    peer_type: PeerType,
}
}
7.8 - Step 8 - Exchange routing table part 1 - node B
At the end of register_peer method node B will performance
RoutingTableSync sync. Sending list of known edges representing full graph,
and list of known AnnounceAccount. Those will be covered later, in their
dedicated sections see sections TODO1, TODO2.
message: PeerMessage::RoutingTableSync(SyncData::edge(new_edge)),
#![allow(unused)]
fn main() {
/// Contains metadata used for routing messages to particular `PeerId` or `AccountId`.
pub struct RoutingTableSync { // also known as `SyncData` (#5489)
    /// List of known edges from `RoutingTableActor::edges_info`.
    pub(crate) edges: Vec<Edge>,
    /// List of known `account_id` to `PeerId` mappings.
    /// Useful for `send_message_to_account` method, to route message to particular account.
    pub(crate) accounts: Vec<AnnounceAccount>,
}
}
7.9 - Step 9 - Exchange routing table part 2 - node A
Upon receiving RoutingTableSync message. Node A will reply with own
RoutingTableSync message.
7.10 - Step 10 - Exchange routing table part 2 - node B
Node B will get the message from A and update it's routing table.
8. Adding new edges to routing tables
This section covers the process of adding new edges, received from another nodes, to the routing table. It consists of several steps covered below.
8.1 Step 1
PeerManagerActor receives RoutingTableSync message containing list of new
edges to add. RoutingTableSync contains list of edges of the P2P network.
This message is then forwarded to RoutingTableActor.
8.2 Step 2
PeerManagerActor forwards those edges to RoutingTableActor inside of
ValidateEdgeList struct.
ValidateEdgeList contains:
- list of edges to verify
- peer who send us the edges
8.3 Step 3
RoutingTableActor gets the ValidateEdgeList message. Filters out edges
that have already been verified, those that are already in
RoutingTableActor::edges_info.
Then, it updates edge_verifier_requests_in_progress to mark that edge
verifications are in progress, and edges shouldn't be pruned from Routing Table
(see section TODO).
Then, after removing already validated edges, the modified message is forwarded
to EdgeValidatorActor.
8.4 Step 4
EdgeValidatorActor goes through list of all edges. It checks whether all edges
are valid (their cryptographic signatures match, etc.).
If any edge is not valid peer will be banned.
Edges that are validated are written to a concurrent queue
ValidateEdgeList::sender. This queue is used to transfer edges from
EdgeValidatorActor, back to PeerManagerActor.
8.5 Step 5
broadcast_validated_edges_trigger runs, and gets validated edges from
EdgeVerifierActor.
Every new edge will be broadcast to all connected peers.
And then, all validated edges received from EdgeVerifierActor will be sent
again to RoutingTableActor inside AddVerifiedEdges.
8.5 Step 6
When RoutingTableActor receives RoutingTableMessages::AddVerifiedEdges, the
methodadd_verified_edges_to_routing_table will be called. It will add edges to
RoutingTableActor::edges_info struct, and mark routing table, that it needs
recalculation see RoutingTableActor::needs_routing_table_recalculation.
9 Routing table computation
Routing table computation does a few things:
- For each peer
B, calculates set of peers|C_b|, such that each peer is on the shortest path toB. - Removing unreachable edges from memory and storing them to disk.
- The distance is calculated as the minimum number of nodes on the path from
given node
A, to each other node on the network. That is,Ahas a distance of0to itself. It's neighbors will have a distance of1. The neighbors of theirs neighbors will have a distance of2, etc.
9.1 Step 1
PeerManagerActor runs a update_routing_table_trigger every
UPDATE_ROUTING_TABLE_INTERVAL seconds.
RoutingTableMessages::RoutingTableUpdate message is sent to
RoutingTableActor to request routing table re-computation.
9.2 Step 2
RoutingTableActor receives the message, and then
- calls
recalculate_routing_tablemethod, which computesRoutingTableActor::peer_forwarding: HashMap<PeerId, Vec<PeerId>>. For eachPeerIdon the network, gives list of connected peers, which are on the shortest path to the destination. It marks reachable peers inpeer_last_time_reachablestruct. - calls
prune_edgeswhich removes from memory all edges, that were not reachable for at least 1 hour, based onpeer_last_time_reachabledata structure. Those edges are then stored to disk.
9.3 Step 3
RoutingTableActor sends RoutingTableUpdateResponse message back to
PeerManagerActor.
PeerManagerActor keep local copy of edges_info, called local_edges_info
containing only edges adjacent to current node.
RoutingTableUpdateResponsecontains list of local edges, whichPeerManagerActorshould remove.peer_forwardingwhich represent on how to route messages in the P2P networkpeers_to_ban- list of peers to ban for sending us edges, which failed validation inEdgeVerifierActor.
9.4 Step 4
PeerManagerActor received RoutingTableUpdateResponse and then:
- updates local copy of
peer_forwarding, used for routing messages. - removes
local_edges_to_removefromlocal_edges_info. - bans peers, who sent us invalid edges.
10. Message transportation layers.
This section describes different protocols of sending messages currently used in
Near
10.1 Messages between Actors.
Near is build on Actix's actor framework.
(https://actix.rs/book/actix/sec-2-actor.html) Usually each actor runs on its
own dedicated thread. Some, like PeerActor have one thread per each instance.
Only messages implementing actix::Message, can be sent using between threads.
Each actor has its own queue; Processing of messages happens asynchronously.
We should not leak implementation details into the spec.
Actix messages can be found by looking for impl actix::Message.
10.2 Messages sent through TCP
Near is using borsh serialization to exchange messages between nodes (See
https://borsh.io/). We should be careful when making changes to them. We have to
maintain backward compatibility. Only messages implementing BorshSerialize,
BorshDeserialize can be sent. We also use borsh for database storage.
10.3 Messages sent/received through chain/jsonrpc
Near runs a json REST server. (See actix_web::HttpServer). All messages sent
and received must implement serde::Serialize and serde::Deserialize.
11. Code flow - routing a message
This is the example of the message that is being sent between nodes
(RawRoutedMessage)
(https://github.com/near/nearcore/blob/fa8749dc60fe0de8e94c3046571731c622326e9f/chain/network-primitives/src/types.rs#L362)
Each of these methods have a target - that is either the account_id or peer_id
or hash (which seems to be used only for route back...). If target is the
account - it will be converted using routing_table.account_owner to the peer.
Upon receiving the message, the PeerManagerActor will sign it
(https://github.com/near/nearcore/blob/master/chain/network/src/peer_manager.rs#L1285)
And convert into RoutedMessage (which also have things like TTL etc.).
Then it will use the routing_table, to find the route to the target peer (add
route_back if needed) and then send the message over the network as
PeerMessage::Routed. Details about routing table computations are covered in
section 8.
When Peer receives this message (as PeerMessage::Routed), it will pass it to
PeerManager (as RoutedMessageFrom), which would then check if the message is
for the current PeerActor. (if yes, it would pass it for the client) and if
not - it would pass it along the network.
All these messages are handled by receive_client_message in Peer.
(NetworkClientMessags) - and transferred to ClientActor in
(chain/client/src/client_actor.rs)
NetworkRequests to PeerManager actor trigger the RawRoutedMessage for
messages that are meant to be sent to another peer.
lib.rs (ShardsManager) has a network_adapter - coming from client’s
network_adapter that comes from ClientActor that comes from start_client call
that comes from start_with_config (that crates PeerManagerActor - that is
passed as target to network_recipent).
12. Database
12.1 Storage of deleted edges
Everytime a group of peers becomes unreachable at the same time; We store edges belonging to them in components. We remove all of those edges from memory, and save them to database, If any of them were to be reachable again, we would re-add them. This is useful in case there is a network split, to recover edges if needed.
Each component is assigned a unique nonce, where first one is assigned nonce
0. Each new component, a get assigned a consecutive integer.
To store components, we have the following columns in the DB.
DBCol::LastComponentNonceStorescomponent_nonce: u64, which is the last used nonce.DBCol::ComponentEdgesMapping fromcomponent_nonceto list of edges.DBCol::PeerComponentMapping frompeer_idto last componentnonceit belongs to.
12.2 Storage of account_id to peer_id mapping
ColAccountAnouncements -> Stores a mapping from account_id to tuple
(account_id, peer_id, epoch_id, signature).
Overview
This chapter describes various development processes and best practices employed at nearcore.
Code Style
This document specifies the code style to use in the nearcore repository. The primary goal here is to achieve consistency, maintain it over time, and cut down on the mental overhead related to style choices.
Right now, nearcore codebase is not perfectly consistent, and the style
acknowledges this. It guides newly written code and serves as a tie breaker for
decisions. Rewriting existing code to conform 100% to the style is not a goal.
Local consistency is more important: if new code is added to a specific file,
it's more important to be consistent with the file rather than with this style
guide.
This is a live document, which intentionally starts in a minimal case. When doing code-reviews, consider if some recurring advice you give could be moved into this document.
Formatting
Use rustfmt for minor code formatting decisions. This rule is enforced by CI
Rationale: rustfmt style is almost always good enough, even if not always
perfect. The amount of bikeshedding saved by rustfmt far outweighs any
imperfections.
Idiomatic Rust
While the most important thing is to solve the problem at hand, we strive to
implement the solution in idiomatic Rust, if possible. To learn what is
considered idiomatic Rust, a good start are the Rust API guidelines (but keep in
mind that nearcore is not a library with public API, not all advice applies
literally):
https://rust-lang.github.io/api-guidelines/about.html
When in doubt, ask question in the Rust 🦀 Zulip stream or during code review.
Rationale: Consistency, as there's usually only one idiomatic solution amidst many non-idiomatic ones. Predictability, you can use the APIs without consulting documentation. Performance, ergonomics and correctness: language idioms usually reflect learned truths, which might not be immediately obvious.
Style
This section documents all micro-rules which are not otherwise enforced by
rustfmt.
Avoid AsRef::as_ref
When you have some concrete type, prefer .as_str, .as_bytes, .as_path over
generic .as_ref. Only use .as_ref when the type in question is a generic
T: AsRef<U>.
#![allow(unused)]
fn main() {
// GOOD
fn log_validator(account_id: AccountId) {
    metric_for(account_id.as_str())
       .increment()
}

// BAD
fn log_validator(account_id: AccountId) {
    metric_for(account_id.as_ref())
       .increment()
}
}
Note that Option::as_ref, Result::as_ref are great, use do use them!
Rationale: readability and churn-resistance. There might be more than one
AsRef<U> implementation for a given type (with different Us). If a new
implementation is added, some of the .as_ref() calls might break. See also
https://github.com/rust-lang/rust/issues/62586.
Avoid references to Copy-types
Various generic APIs in Rust often return references to data (&T). When T is
a small Copy type like i32, you end up with &i32 while many API expect
i32, so dereference has to happen somewhere. Prefer dereferencing as early
as possible, typically in a pattern:
#![allow(unused)]
fn main() {
// GOOD
fn compute(map: HashMap<&'str, i32>) {
    if let Some(&value) = map.get("key") {
        process(value)
    }
}
fn process(value: i32) { ... }

// BAD
fn compute(map: HashMap<&'str, i32>) {
    if let Some(value) = map.get("key") {
        process(*value)
    }
}
fn process(value: i32) { ... }
}
Rationale: if the value is used multiple times, dereferencing in the pattern saves keystrokes. If the value is used exactly once, we just want to be consistent. Additional benefit of early deref is reduced scope of borrow.
Note that for some big Copy types, notably CryptoHash, we sometimes use
references for performance reasons. As a rule of thumb, T is considered big if
size_of::<T>() > 2 * size_of::<usize>().
Prefer for loops over for_each and try_for_each methods
Iterators offer for_each and try_for_each methods which allow executing
a closure over all items of the iterator. This is similar to using a for loop
but comes with various complications and may lead to less readable code. Prefer
using a loop rather than those methods, for example:
#![allow(unused)]
fn main() {
// GOOD
for outcome_with_id in result? {
    *total_gas_burnt =
        safe_add_gas(*total_gas_burnt, outcome_with_id.outcome.gas_burnt)?;
    outcomes.push(outcome_with_id);
}

// BAD
result?.into_iter().try_for_each(
    |outcome_with_id: ExecutionOutcomeWithId| -> Result<(), RuntimeError> {
        *total_gas_burnt =
            safe_add_gas(*total_gas_burnt, outcome_with_id.outcome.gas_burnt)?;
        outcomes.push(outcome_with_id);
        Ok(())
    },
)?;
}
Rationale: The for_each and try_for_each method don’t play nice with
break and continue statements nor do they mesh well with async IO (since
.await inside of the closure isn’t possible). And while try_for_each allows
for the use of question mark operator, one may end up having to uses it twice:
once inside the closure and second time outside the call to try_for_each.
Furthermore, usage of the functions often introduce some minor syntax noise.
There are situations when those methods may lead to more readable code. Common example are long call chains. Even then such code may evolve with the closure growing and leading to less readable code. If advantages of using the methods aren’t clear cut, it’s usually better to err on side of more imperative style.
Lastly, anecdotally the methods (e.g. when used with chain or flat_map) may
lead to faster code. This intuitively makes sense but it’s worth to keep in
mind that compilers are pretty good at optimising and in practice may generate
optimal code anyway. Furthermore, optimising code for readability may be more
important (especially outside of hot path) than small performance gains.
Prefer to_string to format!("{}")
Prefer calling to_string method on an object rather than passing it through
format!("{}") if all you’re doing is converting it to a String.
#![allow(unused)]
fn main() {
// GOOD
lat hash = block_hash.to_string();
let msg = format!("{}: failed to open", path.display());

// BAD
lat hash = format!("{block_hash}");
let msg = path.display() + ": failed to open";
}
Rationale: to_string is shorter to type and also faster.
Import Granularity
Group import by module, but not deeper:
#![allow(unused)]
fn main() {
// GOOD
use std::collections::{hash_map, BTreeSet};
use std::sync::Arc;

// BAD - nested groups.
use std::{
    collections::{hash_map, BTreeSet},
    sync::Arc,
};

// BAD - not grouped together.
use std::collections::BTreeSet;
use std::collections::hash_map;
use std::sync::Arc;
}
This corresponds to "rust-analyzer.assist.importGranularity": "module" setting
in rust-analyzer
(docs).
Rationale: Consistency, matches existing practice.
Import Blocks
Do not separate imports into groups with blank lines. Write a single block of
imports and rely on rustfmt to sort them.
#![allow(unused)]
fn main() {
// GOOD
use crate::types::KnownPeerState;
use borsh::BorshSerialize;
use near_primitives::utils::to_timestamp;
use near_store::{DBCol::Peers, Store};
use rand::seq::SliceRandom;
use std::collections::HashMap;
use std::net::SocketAddr;

// BAD -- several groups of imports
use std::collections::HashMap;
use std::net::SocketAddr;

use borsh::BorshSerialize;
use rand::seq::SliceRandom;

use near_primitives::utils::to_timestamp;
use near_store::{DBCol::Peers, Store};

use crate::types::KnownPeerState;
}
Rationale: Consistency, ease of automatic enforcement. Today stable rustfmt can't split imports into groups automatically, and doing that manually consistently is a chore.
Derives
When deriving an implementation of a trait, specify a full path to the traits provided by the external libraries:
#![allow(unused)]
fn main() {
// GOOD
#[derive(Copy, Clone, serde::Serialize, thiserror::Error, strum::Display)]
struct Grapefruit;

// BAD
use serde::Serialize;
use thiserror::Error;
use strum::Display;

#[derive(Copy, Clone, Serialize, Error, Display)]
struct Banana;
}
As an exception to this rule, it is okay to use either style when the derived trait already
includes the name of the library (as would be the case for borsh::BorshSerialize.)
Rationale: Specifying a full path to the externally provided derivations here makes it
straightforward to differentiate between the built-in derivations and those provided by the
external crates. The surprise factor for derivations sharing a name with the standard
library traits (Display) is reduced and it also acts as natural mechanism to tell apart names
prone to collision (Serialize), all without needing to look up the list of imports.
Standard Naming
- Use
-rather than_in crate names and in corresponding folder names. - Avoid single-letter variable names especially in long functions. Common
i,jetc. loop variables are somewhat of an exception but since Rust encourages use of iterators those cases aren’t that common anyway. - Follow standard Rust naming patterns such as:
- Don’t use
get_prefix for getter methods. A getter method is one which returns (reference to) a field of an object. - Use
set_prefix for setter methods. An exception are builder objects which may use different naming style. - Use
into_prefix for methods which consumeselfandto_prefix for methods which don’t.
- Don’t use
- Use
get_block_headerrather thanget_headerfor methods which return a block header. - Don’t use
_by_hashsuffix for methods which lookup chain objects (blocks, chunks, block headers etc.) by their hash (i.e. their primary identifier). - Use
_by_heightand similar suffixes for methods which lookup chain objects (blocks, chunks, block headers etc.) by their height or other property which is not their hash.
Rationale: Consistency.
Documentation
When writing documentation in .md files, wrap lines at approximately 80
columns.
<!-- GOOD -->
Manually reflowing paragraphs is tedious. Luckily, most editors have this
functionality built in or available via extensions. For example, in Emacs you
can use `fill-paragraph` (<kbd>M-q</kbd>), (neo)vim allows rewrapping with `gq`,
and VS Code has `stkb.rewrap` extension.

<!-- BAD -->
One sentence per-line is also occasionally used for technical writing.
We avoid that format though.
While convenient for editing, it may be poorly legible in unrendered form

<!-- BAD -->
Definitely don't use soft-wrapping. While markdown mostly ignores source level line breaks, relying on soft wrap makes the source completely unreadable, especially on modern wide displays.
Tracing
When emitting events and spans with tracing prefer adding variable data via
tracing's field mechanism.
#![allow(unused)]
fn main() {
// GOOD
debug!(
    target: "client",
    validator_id = self.client.validator_signer.as_ref().map(|vs| {
        tracing::field::display(vs.validator_id())
    }),
    %hash,
    "block.previous_hash" = %block.header().prev_hash(),
    "block.height" = block.header().height(),
    %peer_id,
    was_requested
    "Received block",
);
}
Most apparent violation of this rule will be when the event message utilizes any form of formatting, as seen in the following example:
#![allow(unused)]
fn main() {
// BAD
debug!(
    target: "client",
    "{:?} Received block {} <- {} at {} from {}, requested: {}",
    self.client.validator_signer.as_ref().map(|vs| vs.validator_id()),
    hash,
    block.header().prev_hash(),
    block.header().height(),
    peer_id,
    was_requested
);
}
Always specify the target explicitly. A good default value to use is the crate
name, or the module path (e.g. chain::client) so that events and spans common
to a topic can be grouped together. This grouping can later be used for
customizing of which events to output.
Rationale: This makes the events structured – one of the major value propositions of the tracing ecosystem. Structured events allow for immediately actionable data without additional post-processing, especially when using some of the more advanced tracing subscribers. Of particular interest would be those that output events as JSON, or those that publish data to distributed event collection systems such as opentelemetry. Maintaining this rule will also usually result in faster execution (when logs at the relevant level are enabled.)
Spans
Use the spans to introduce context and grouping to and between events instead of manually adding such information as part of the events themselves. Most of the subscribers ingesting spans also provide a built-in timing facility, so prefer using spans for measuring the amount of time a section of code needs to execute.
Give spans simple names that make them both easy to trace back to code, and to
find a particular span in logs or other tools ingesting the span data. If a
span begins at the top of a function, prefer giving it a name of that function,
otherwise prefer a snake_case name.
Use the regular span API over convenience macros such as #[instrument], as
this allows instrumenting portions of a function without affecting the code
structure:
#![allow(unused)]
fn main() {
fn compile_and_serialize_wasmer(code: &[u8]) -> Result<wasmer::Module> {
    let _span = tracing::debug_span!(target: "vm", "compile_and_serialize_wasmer").entered();
    // ...
    // _span will be dropped when this scope ends, terminating the span created above.
    // You can also `drop` it manually, to end the span early with `drop(_span)`.
}
}
Rationale: Much as with events, this makes the information provided by spans
structured and contextual. This information can then be output to tooling in an
industry standard format, and can be interpreted by an extensive ecosystem of
tracing subscribers.
Event and span levels
The INFO level is enabled by default, use it for information useful for node
operators. The DEBUG level is enabled on the canary nodes, use it for
information useful in debugging testnet failures. The TRACE level is not
generally enabled, use it for arbitrary debug output.
Metrics
Consider adding metrics to new functionality. For example, how often each type of error was triggered, how often each message type was processed.
Rationale: Metrics are cheap to increment, and they often provide a significant insight into operation of the code, almost as much as logging. But unlike logging metrics don't incur a significant runtime cost.
Naming
Prefix all nearcore metrics with near_.
Follow [https://prometheus.io/docs/practices/naming/](Prometheus naming convention)
for new metrics.
Rationale: The near_ prefix makes it trivial to separate metrics exported
by nearcore from other metrics, such as metrics about the state of the machine
that runs neard.
Performance
In most cases incrementing a metric is cheap enough never to give it a second thought. However accessing a metric with labels on a hot path needs to be done carefully.
If a label is based on an integer, use a faster way of converting an integer
to the label, such as the itoa crate.
For hot code paths, re-use results of with_label_values() as much as possible.
Rationale: We've encountered issues caused by the runtime costs of incrementing metrics before. Avoid runtime costs of incrementing metrics too often.
Tracking issues
nearcore uses so called "tracking issues" to coordinate larger pieces of work
(e.g. implementation of new NEPs). Such issues are tagged with the
C-tracking-issue
label.
The goal of tracking issues is to serve as a coordination point. They can help new contributors and other interested parties come up-to-speed with the current state of projects. As such, they should link to things like design docs, todo-lists of sub-issues, existing implementation PRs, etc.
One can further use tracking issues to:
- get a feeling for what's happening in
nearcoreby looking at the set of open tracking issues. - find larger efforts to contribute to as tracking issues usually contain up-for-grabs todo lists.
- follow progress of a specific features by subscribing to the issue on Github.
If you are leading or participating in a larger effort, please create a tracking issue for your work.
Guidelines
- Tracking issues should be maintained in the
nearcorerepository. If the projects are security sensitive, then they should be maintained in thenearcore-privaterepository. - The issues should be kept up-to-date. At a minimum, all new context should be added as comments, but preferably the original description should be edited to reflect the current status.
- The issues should contain links to all the relevant design documents which should also be kept up-to-date.
- The issues should link to any relevant NEP if applicable.
- The issues should contain a list of todo tasks which should be kept up-to-date as new work items are discovered and other items are done. This helps others gauge progress and helps lower the barrier of entry for others to participate.
- The issues should contain links to relevant Zulip discussions. Prefer open forums like Zulip for discussions. When necessary, closed forums like video calls can also be used but care should be taken to document a summary of the discussions.
- For security sensitive discussions, use the appropriate private Zulip streams.
This issue is a good example of how tracking issues should be maintained.
Background
The idea of tracking issues is also used to track project work in the Rust language. See this post for a rough description and these issues for how they are used in Rust.
Fast Builds
nearcore is implemented in Rust and is a fairly sizable project, so it takes a while to build. This chapter collects various tips to make the process faster.
Optimizing build times is a bit of a black art, so please do benchmarks on your machine to verify that the improvement work for you. Changing some configuration and making some type, which prevents it from improving build times is an extremely common failure mode!
Rust Perf Book contains a section on compilation time as well!
Release Builds and Link Time Optimization
Obviously, cargo build --release is slower than cargo build. What's not
entirely obvious is that cargo build -r is not as slow as it could be: our
--release profile is somewhat optimized for fast builds, as it doesn't enable
full LTO.
When building production binaries, we use lto=true and codegen-units=1
options, which make the build significantly slower (but the resulting binary
somewhat faster). Keep this in mind when running benchmarks or parameter
estimation.
Linker
By default, rustc uses system's linker, which might be quite slow. Using lld
(LLVM linker) or mold (very new, very fast linker) is usually a big win.
I don't know what's the official source of truth for using alternative linkers, I usually refer to this comment.
Usually, adding
[build]
rustflags = ["-C", "link-arg=-fuse-ld=lld"]
to ~/.cargo/config is the most convenient approach.
lld itself can be installed with sudo apt install lld.
Prebuilt RocksDB
By default, we compile RocksDB (a C++ project) from source, which takes a lot of
time. A faster alternative is to link to a prebuilt copy of RocksDB. This is a
huge win, especially if you clean ./target directory frequently.
To use prebuilt RocksDB set ROCKSDB_LIB_DIR environment variable to location
where librocksdb.a file is installed:
$ export ROCKSDB_LIB_DIR=/usr/lib/x86_64-linux-gnu
$ cargo build -p neard
Note that the system must provide a recent version of the library which,
depending on operating system you’re using, may require installing packages from
testing branches. For example, on Debian it requires installing
librocksdb-dev from experimental version:
echo 'deb http://ftp.debian.org/debian experimental main contrib non-free' |
    sudo tee -a /etc/apt/sources.list
sudo apt update
sudo apt -t experimental install librocksdb-dev

ROCKSDB_LIB_DIR=/usr/lib/x86_64-linux-gnu
export ROCKSDB_LIB_DIR
Global Compilation Cache
By default, Rust uses incremental compilation, with intermediate artifacts
stored in the project-local ./target directory.
sccache utility can be used to add a
global compilation to the mix:
$ cargo install sccache
$ export RUSTC_WRAPPER="sccache"
$ export SCCACHE_CACHE_SIZE="30G"
$ cargo build -p neard
sccache intercepts calls to rustc and pattern-matches compiler's command
line to get a cached result.
IDEs Are Bad For Environment
Generally, the knobs in this section are controlled either via global
configuration in ~/.cargo/config or environmental variables.
Environmental variables are notoriously easy to lose, especially if you are working both from a command line and from a graphical IDE. Double check that you are not missing any of our build optimizations, the failure mode here is nasty, as the stuff just takes longer to compile without givin any visual indication of an error.
direnv sometimes can be used to conveniently manage
project-specific environmentalvariable.
General principles
- Every PR needs to have test coverage in place. Sending the code change and deferring tests for a future change is not acceptable.
- Tests need to either be sufficiently simple to follow, or have good documentation to explain why certain actions are made and conditions are expected.
- When implementing a PR, make sure to run the new tests with the change disabled and confirm that they fail! It is extremely common to have tests that pass without the change that is being tested.
- The general rule of thumb for a reviewer is to first review the tests, and ensure that they can convince themselves that the code change that passes the tests must be correct. Only then the code should be reviewed.
- Have the assertions in the tests as specific as possible. For example, do not
do
assert!(result.is_err()), expect the specific error instead.
Tests hierarchy
In NEAR Reference Client we largely split tests into three categories:
- Relatively cheap sanity or fast fuzz tests. It includes all the
#[test]Rust tests not decorated by features. Our repo is configured in such a way that all such tests are ran on every PR, and failing at least one of them is blocking the PR from being pushed.
To run such tests locally run cargo test --all
- Expensive tests. This includes all the fuzzy tests that run many iterations,
as well as tests that spin up multiple nodes and run them until they reach a
certain condition. Such tests are decorated with
#[cfg(feature="expensive-tests")]. It is not trivial to enable features that are not declared in the top level crate, and thus the easiest way to run such tests is to enable all the features by passing--all-featurestocargo test, e.g:
cargo test --package near-client --test cross_shard_tx tests::test_cross_shard_tx --all-features
- Python tests. We have an infrastructure to spin up nodes, both locally and
remotely, in python, and interact with them using RPC. The infrastructure and
the tests are located in
pytestfolder. The infrastructure is relatively straightforward, see for exampleblock_production.pyhere. See theTest infrastructuresection below for details.
Expensive and python tests are not part of CI, and are run by a custom nightly runner. The results of the latest runs are available here. With today tests runs launch approximately every 5-6 hours. For the latest results look at the second run, since the first one has some tests still scheduled to run.
Test infrastructure
Different levels of the reference implementation have different infrastructure available to test them.
Client
Client is separated from the runtime via a RuntimeAdapter trait. In production
it uses NightshadeRuntime that uses real runtime and epoch managers. To test
client without instantiating runtime and epoch manager, we have a mock runtime
KeyValueRuntime.
Most of the tests in the client work by setting up either a single node (via
setup_mock()) or multiple nodes (via setup_mock_all_validators()) and then
launching the nodes and waiting for a particular message to occur, with a
predefined timeout.
For the most basic example of using this infrastructure see produce_two_blocks
in
tests/process_blocks.rs.
- The callback (
Box::new(move |msg, _ctx, _| { ...) is what is executed whenever the client sends a message. The return value of the callback is sent back to the client, which allows testing relatively complex scenarios. The tests generally expect a particular message to occur, in this case the tests expects two blocks to be produced.System::current().stop();is the way to stop the test and mark it as passed. near_network::test_utils::wait_or_panic(5000);is how the timeout for the test is set (in milliseconds).
For an example of a test that launches multiple nodes, see
chunks_produced_and_distributed_common in
tests/chunks_management.rs.
The setup_mock_all_validators function is the key piece of infrastructure here.
Runtime
Tests for Runtime are listed in tests/test_cases_runtime.rs.
To run a test, usually a mock RuntimeNode is created via
create_runtime_node(). In its constructor the Runtime is created in the
get_runtime_and_trie_from_genesis function.
Inside a test an abstraction User is used for sending specific actions to the
runtime client. The helper functions function_call, deploy_contract, etc.
eventually lead to the Runtime.apply method call.
For setting usernames during playing with transactions, use default names
alice_account, bob_account, eve_dot_alice_account, etc.
Network
TODO: explain the runner here
Chain, Epoch Manager, Runtime and other low level changes
When building new features in the chain, epoch_manager, network, make sure
to build new components sufficiently abstract so that they can be tested without
relying on other components.
For example, see tests for doomslug here, for network cache here, or for promises in runtime here.
Python tests
See this page for a detailed coverage of how to write a python test.
We have a python library that allows one to create and run python tests.
To run python tests, from the nearcore repo the first time do the following:
cd pytest
virtualenv . --python=python3
pip install -r requirements.txt
. .env/bin/activate
python tests/sanity/block_production.py
After the first time:
cd pytest
. .env/bin/activate
python tests/sanity/block_production.py
Use pytest/tests/sanity/block_production.py as the basic example of starting a
cluster with multiple nodes, and doing RPC calls.
See pytest/tests/sanity/deploy_call_smart_contract.py to see how contracts can
be deployed, or transactions called.
See pytest/tests/sanity/staking1.py to see how staking transactions can be
issued
See pytest/tests/sanity/state_sync.py to see how to delay the launch of the
whole cluster by using init_cluster instead of start_cluster, and then
launching nodes manually.
Enabling adversarial behavior
To allow testing adversarial behavior, or generally behaviors that a node should
not normally exercise, we have certain features in the code decorated with
#[cfg(feature="adversarial")]. The binary normally is compiled with the
feature disabled, and when compiled with the feature enabled, it traces a
warning on launch.
The nightly runner runs all the python tests against the binary compiled with the feature enabled, and thus the python tests can make the binary perform actions that it normally would not perform.
The actions can include lying about the known chain height, producing multiple blocks for the same height, or disabling doomslug.
See all the tests under pytest/tests/adversarial for the examples.
Python Tests
To simplify writing integration tests for nearcore we have a python infrastructure that allows writing a large variety of tests that run small local clusters, remove clusters, or run against full scale live deployments.
Such tests are written in python and not in Rust (in which the nearcore itself, and most of the sanity and fuzz tests, are written) due to availability of libraries to easily connect to remove nodes, and orchestrate cloud instances.
Nearcore itself has several features guarded by a feature-flag that allow the python tests to invoke behaviors otherwise impossible to be exercised by an honest actor.
Basics
The infrastructure is located in {nearcore}/pytest/lib and the tests
themselves in subdirs of {nearcore}/pytest/tests. To prepare local machine to
run the tests you'd need python3 (python 3.7), and have several dependencies
installed, for which we recommend using virtualenv:
cd pytest
virtualenv .env --python=python3
. .env/bin/activate
pip install -r requirements.txt
The tests are expected to be ran from the pytest dir itself. For example, once
the virtualenv is configured:
cd pytest
. .env/bin/activate
python tests/sanity/block_production.py
will run the most basic tests that spins up a small cluster locally and waits until it produces several blocks.
Compiling the client for tests
The local tests by default expect the binary to be in the default location for a
debug build ({nearcore}/target/debug). Some tests might also expect
test-specific features guarded by a feature-flag to be available. To compile the
binary with such features run
cargo build -p neard --features=adversarial
The feature is called adversarial to highlight that many functions it enables,
outside of tests, would constitute a malicious behavior. The node compiled with
such a flag will not start unless an environment variable ADVERSARY_CONSENT=1
is set and prints a noticeable warning when starts, thus minimizing the chance
that an honest participant accidentally launches a node compiled with such
functionality.
You can change the way the tests run (locally or using Google Cloud), and where the local tests look for binary by supplying a config file. For example, if you want to run tests against a release build, you can create a file with the following config:
{"local": True, "near_root": "../target/release/"}
and run the test with the following command line:
NEAR_PYTEST_CONFIG=<path to config> python tests/sanity/block_production.py
Writing tests
We differentiate between "regular" tests, or tests that spin up their own cluster, either local or on the cloud, and "mocknet" tests, or tests that run against an existing live deployment of NEAR.
In both cases the test starts by importing the infrastructure and starting or connecting to a cluster
Starting a cluster
In the simplest case a regular test starts by starting a cluster. The cluster will run locally by default, but can be spun up on the cloud by supplying corresponding config.
import sys
sys.path.append('lib')
from cluster import start_cluster

nodes = start_cluster(4, 0, 4, None, [["epoch_length", 10], ["block_producer_kickout_threshold", 80]], {})
In the example above the first three parameters are num_validating_nodes,
num_observers, num_shards. The third parameter is a config, which generally
should be None, in which case the config is picked up from the environment
variable as shown above.
start_cluster will spin up num_validating_nodes nodes that are block
producers (with pre-staked tokens), num_observers non-validating nodes and
will configure the system to have num_shards shards. The fifth argument
changes the genesis config. Each element is a list of some length n where the
first n-1 elements are a path in the genesis JSON file, and the last element
is the value. You'd often want to significantly reduce the epoch length, so that
your test triggers epoch switches, and reduce the kickout threshold, since with
shorter epochs it is easier for a block producer to get kicked out.
The last parameter is a dictionary from the node ordinal to changes to their local config.
Note that start_cluster spins up all the nodes right away. Some tests (e.g.
tests that test syncing) might want to configure the nodes, but delay their
start. In such a case you will initialize the cluster by calling to
init_cluster, and will run the nodes manually, for example see
state_sync.py
Connecting to a mocknet
Nodes that run against a mocknet would connect to an existing cluster instead of running their own.
import sys
sys.path.append('lib')
from cluster import connect_to_mocknet

nodes, accounts = connect_to_mocknet(None)
The only parameter is a config, with None meaning to use the config from the
environment variable. The config should have the following format:
{
    "nodes": [
        {"ip": "(some_ip)", "port": 3030},
        {"ip": "(some_ip)", "port": 3030},
        {"ip": "(some_ip)", "port": 3030},
        {"ip": "(some_ip)", "port": 3030}
    ],
    "accounts": [
        {"account_id": "node1", "pk": "ed25519:<public key>", "sk": "edd25519:<secret key>"},
        {"account_id": "node2", "pk": "ed25519:<public key>", "sk": "edd25519:<secret key>"}
    ]
}
Manipulating nodes
The nodes returned by start_cluster and init_cluster have certain
convenience functions. You can see the full interface in
{nearcore}/pytest/lib/cluster.py.
start(boot_public_key, (boot_ip, boot_port)) starts the node. If both
arguments are None, the node will start as a boot node (note that the concept
of a "boot node" is relatively vague in a decentralized system, and from the
perspective of the tests the only requirement is that the graph of "node A
booted from node B" is connected).
The particular way to get the boot_ip and boot_port when launching node1
with node2 being its boot node is the following:
node1.start(node2.node_key.pk, node2.addr())
kill() shuts down the node by sending it SIGKILL
reset_data() cleans up the data dir, which could be handy between the calls to
kill and start to see if a node can start from a clean state.
Nodes on the mocknet do not expose start, kill and reset_data.
Issuing RPC calls
Nodes in both regular and mocknet tests expose an interface to issue RPC calls.
In the most generic case one can just issue raw JSON rpc call by calling
json_rpc method:
validator_info = nodes[0].json_rpc('validators', [<some block_hash>])
For the most popular calls there are convenience functions:
send_txsends a signed transaction asynchronouslysend_tx_and_waitssends a signed transaction synchronouslyget_statusreturns the current status (the output of the `/status/ endpoint), which contains e.g. last block hash and heightget_txreturns a transaction by the transaction hash and the recipient ID.
See all the methods in {nearcore}/pytest/lib/cluster.rs after the definition
of the json_rpc method.
Signing and sending transactions
There are two ways to send a transaction. A synchronous way (send_tx_and_wait)
sends a tx and blocks the test execution until either the TX is finished, or the
timeout is hit. An asynchronous way (send_tx + get_tx) sends a TX and then
verifies its result later. Here's an end-to-end example of sending a
transaction:
# the tx needs to include one of the recent hashes
last_block_hash = nodes[0].get_status()['sync_info']['latest_block_hash']
last_block_hash_decoded = base58.b58decode(last_block_hash.encode('utf8'))

# sign the actual transaction
# `fr` and `to` in this case are instances of class `Key`.
# In mocknet tests the list `Key`s for all the accounts are returned by `connect_to_mocknet`
# In regular tests each node is associated with a single account, and its key is stored in the
# `signer_key` field (e.g. `nodes[0].signer_key`)
# `15` in the example below is the nonce. Nonces needs to increase for consecutive transactions
# for the same sender account.
tx = sign_payment_tx(fr, to.account_id, 100, 15, last_block_hash_decoded)

# Sending the transaction synchronously. `10` is the timeout in seconds. If after 10 seconds the
# outcome is not ready, throws an exception
if want_sync:
    outcome = nodes[0].send_tx_and_wait(tx, 10)

# Sending the transaction asynchronously.
if want_async:
    tx_hash = nodes[from_ordinal % len(nodes)].send_tx(tx)['result']

    # and then sometime later fetch the result...
    resp = nodes[0].get_tx(tx_hash, to.account_id, timeout=1)
    # and see if the tx has finished
    finished = 'result' in resp and 'receipts_outcome' in resp['result'] and len(resp['result']['receipts_outcome']) > 0
See rpc_tx_forwarding.py for an example of signing and submitting a transaction.
Adversarial behavior
Some tests need certain nodes in the cluster to exercise behavior that is impossible to be invoked by a honest node. For such tests we provide functionality that is protected by an "adversarial" feature flag.
It's an advanced feature, a more thorough documentation is a TODO. Most of the
tests that depend on the feature flag enabled are under
{nearcore}/pytest/tests/adversarial, refer to them for how such features can
be used. Search for code in the nearcore codebase guarded by the "adversarial"
feature flag for the example of how such features are added and exposed.
Interfering with the network
We have a library that allows running a proxy in front of each node that would
intercept all the messages between nodes, deserialize them in python and run a
handler on each one. The handler can then either let the message pass (return True), drop it (return False) or replace it (return <new message>).
This technique can be used to both interfere with the network (by dropping or
replacing messages), and to inspect messages that flow through the network
without interfering with it. For the latter note that the handler for each node
runs in a separate Process, and thus you need to use multiprocessing
primitives if you want the handlers to exchange information with the main test
process, or between each other.
See the tests tests/sanity/proxy_*.py for examples.
Contributing tests
We always welcome new tests, especially python tests that use the above infrastructure. We have a list of test requests here, but also welcome any other tests that test aspects of the network we haven't though about.
Protocol Upgrade
This document describes the entire cycle of how a protocol upgrade is done, from the initial PR to the final release. It is important for everyone who contributes to the development of the protocol and its client(s) to understand this process.
Background
At NEAR, we use protocol version to mean the version of the blockchain protocol and is separate from the version of some specific client (such as nearcore), since the protocol version defines the protocol rather than some specific implementation of the protocol. More concretely, for each epoch, there is a corresponding protocol version that is agreed upon by validators through a voting mechanism. Our upgrade scheme dictates that protocol version X is backward compatible with protocol version X-1, so that nodes in the network can seamlessly upgrade into the new protocol. However, there is no guarantee that protocol version X is backward compatible with protocol version X-2.
Despite the upgrade mechanism, rolling out a protocol change can be scary, especially if the change is invasive. For those changes, we may want to have several months of testing before we are confident that the change itself works and that it doesn't break other parts of the system.
Nightly Protocol features
To make protocol upgrades more robust, we introduce the concept of nightly
protocol version together with the protocol feature flags to allow easy testing
of the cutting-edge protocol changes without jeopardizing the stability of the
codebase overall. In Cargo.toml file of the crates we have in nearcore, we
introduce rust compile-time features nightly_protocol and nightly
nightly_protocol = []
nightly = [
    "nightly_protocol",
    ...
]
where nightly_protocol is a marker feature that indicates that we are on
nightly protocol whereas nightly is a collection of new protocol features
which also implies nightly_protocol. For example, when we introduce EVM as a
new protocol change, suppose the current protocol version is 40, then we would
do the following change in Cargo.toml:
nightly_protocol = []
nightly = [
    "nightly_protocol",
    "protocol_features_evm",
    ...
]
In core/primitives/src/version.rs, we would change the protocol version by:
#![allow(unused)]
fn main() {
#[cfg(feature = “nightly_protocol”)]
pub const PROTOCOL_VERSION: u32 = 100;
#[cfg(not(feature = “nightly_protocol”)]
pub const PROTOCOL_VERSION: u32 = 40;
}
This way the stable versions remain unaffected after the change. Note that nightly protocol version intentionally starts at a much higher number to make the distinction between stable protocol and nightly protocol more clear.
To determine whether a protocol feature is enabled, we do the following:
- We maintain a
ProtocolFeatureenum where each variant corresponds to some protocol feature. For nightly protocol features, the variant is gated by the corresponding rust compile-time feature. - We implement a function
protocol_versionto return, for each variant, the corresponding protocol version in which the feature is enabled. - When we need to decide whether to use the new feature based on the protocol
version of the current network, we can simply compare it to the protocol
version of the feature. To make this simpler, we also introduced a macro
checked_feature
For more details, please refer to core/primitives/src/version.rs.
Feature Gating
It is worth mentioning that there are two types of checks related to protocol features:
- For stable features, we check whether they should be enabled by checking the protocol version of the current epoch. This does not involve any rust compile-time features.
- For nightly features, we have both the check of protocol version and the rust compile-time feature gating.
Testing
Nightly protocol features allow us to enable the most bleeding-edge code in some testing environment. We can choose to enable all nightly protocol features by
#![allow(unused)]
fn main() {
cargo build -p neard --release --features nightly
}
or enable some specific protocol feature by
#![allow(unused)]
fn main() {
cargo build -p neard --release --features nightly_protocol,<protocol_feature>
}
In practice, we have all nightly protocol features enabled for Nayduck tests and on betanet, which is updated daily.
Feature Stabilization
New protocol features are introduced first as nightly features and when the
author of the feature thinks that the feature is ready to be stabilized, they
should submit a pull request to stabilize the feature using this
template. In this
pull request, they should the feature gating, increase the PROTOCOL_VERSION
constant (if it hasn't been increased since the last release), and change the
protocol_version implementation to map the stabilized features to the new
protocol version.
A feature stabilization request must be approved by at least two nearcore code owners Unless it is a security related fix, a protocol feature cannot be included in any release until at least one week after its stabilization. This is to ensure that feature implementation and stabilization are not rushed.
Overview
This chapter holds various assorted bits of docs. If you want to document something, but don't know where to put it, put it here!
Crate Versioning and Publishing
While all the crates in the workspace are directly unversioned (v0.0.0), they
all share a unified variable version in the workspace manifest.
This keeps versions consistent across the workspace and informs their versions
at the moment of publishing.
We also have CI infrastructure set up to automate the publishing process to
crates.io. So, on every merge to master, if there's a version change, it is
automatically applied to all the crates in the workspace and it attempts to
publish the new versions of all non-private crates. All crates that should be
exempt from this process should be marked private. That is, they should have
the publish = false specification in their package manifest.
This process is managed by cargo-workspaces, with a bit of magic sprinkled on top.
Issue Labels
Issue labels are of the following format <type>-<content> where <type> is a
capital letter indicating the type of the label and <content> is a hyphened
phrase indicating what is label is about. For example, in the label C-bug,
C means category and bug means that the label is about bugs. Common types
include C, which means category, A, which means area, T, which means team.
An issue can have multiple labels including which area it touches, which team
should be responsible for the issue, and so on. Each issue should have at least
one label attached to it after it is triaged and the label could be a general
one, such as C-enhancement or C-bug.